Sunday 29 January 2017

I Did It So You Can Try It Too!

My boyfriend and I decided that due to this semester being very busy for both of us, that we would try to meal prep lunch every Sunday. So, that is what we did last weekend! We complied a list of what we would both need for the recipe and made it together. It makes mornings so much easier when you don't have to open the fridge and try to decide what you're going to make for lunch; it's already there and ready! Meal prep helps you make nutritious and healthy decisions every day, without having to put much thought into it.

To start our semester meal prep, we decided to keep it easy. I found a video on facebook of a recipe that looked delicious and very nutritious, that was Pesto Chicken with Green Beans and Tomatoes. This recipe was super easy and a great starter for more meal prep. Both my boyfriend and I loved it, and my fellow interns and classmates thought it smelled great too!

The only thing I would change about this recipe is use fresh pesto (avaliable on the Wegman's Olive Bar) instead of the jarred pesto. The fresh would have covered the chicken and vegetables a lot better. I would also recommend bringing a starch to accompany your lunch. Perhaps an apple or pretzels! That way you hit all the food groups in one sitting!


INGREDIENTS

2 tablespoons olive oil
4 chicken thighs, boneless and skinless
Salt, to taste
Pepper, to taste
1 pound green beans
2 cups cherry tomatoes, halved
½ cup basil pesto

PREPARATION

1. In a large pan, heat olive oil and add chicken thighs. Season with salt and pepper. When the chicken is completely cooked through, remove from pan, slice into strips, and set aside.
2. Add green beans and cook until crisp tender. Return the chicken strips to the pan, then add tomatoes and pesto. Stir until fully incorporated.
3. Serve immediately or divide into 4 food storage containers and store in the refrigerator. Can be kept refrigerated for up to 4 days.
4. Enjoy!
Recipe Adapted from BuzzFeed 
https://www.buzzfeed.com/robertbroadfoot/step-up-your-meal-prep-game
I used chicken tenders for this recipe instead of chicken thighs due to preference. We also doubled it in order for us to get 8 servings out of it too. 

Try it out and tell me what you think! 


Sunday 22 January 2017

Raise a Glass!

There are plenty of options for milk alternatives out there on the market, but do they stack up to the real thing? You may select an alternative based on taste, preference, nutrient content, or health reasons. But an alternative may not be the best for you and your body! I support you and your decision on what kind of milk or altnerative you want to drink. I am just here to clear the air between the differences and help you make a more knowledgeable decision for your life and health.

Let's dive in!

Skim Milk- In just one 8 oz glass of milk, there's only 80 calories! Within those 80 calories, there's no fat at all, less than 5 mg of cholesterol, 12 g of carbohydrates, 8 grams of protein, 30% of the daily value of calcium and 25% of the daily value of Vitamin D! Just one small glass of milk packs a good punch of nutrients! Nothing needed to be added into milk in order to make it like this, its all nautral!


Let's compare it to 8 oz of Soy Milk
One 8 oz glass has 110 calories (thats 30 more than a glass of skim milk). There's 2.5g of fat, 15 g of carbs, 5g of protein, and vitamins that are added into the beverage to add some nutrient content. This is the ingredient list for this vanilla soy milk -
  • Organic soymilk (filtered water, whole organic soybeans)
  • Brown rice sweetener (filtered water, brown rice)
  • Natural vanilla flavor with other natural flavors
  • Tricalcium phosphate
  • Sea salt
  • Carrageenan
  • Vitamin A palmitate
  • Vitamin D2 


Let's look at Almond Milk
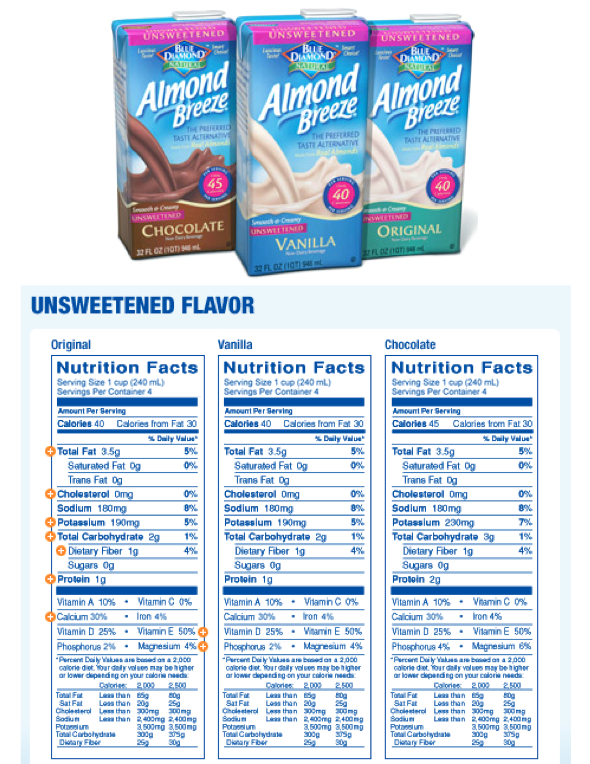
 It has only 30 calories in an 8 oz glass of the unsweetened variety, but it has 3.5g of fat, 3g of carbohydrates and only 2g, at most, of protein.  There is a significantly less amount of nutrients in almond milk compared to skim milk!

Let's look at Coconut milk!
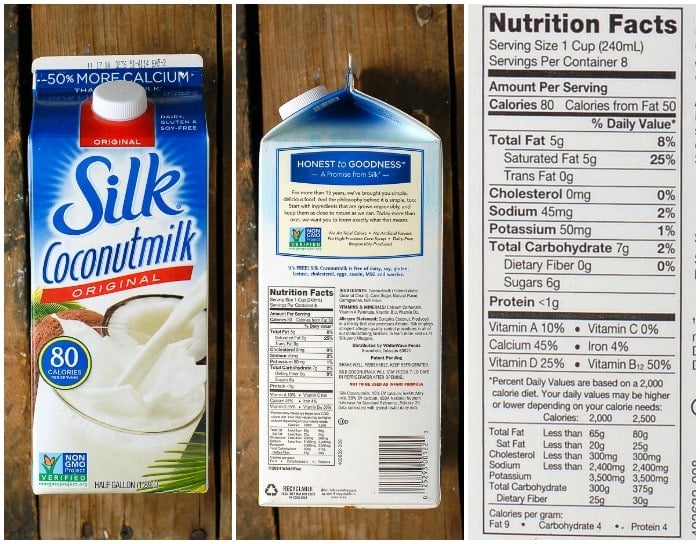
One 8oz glass of coconut milk has 80 calories, like the skim milk, but has 5g of fat all coming from saturated fat, 7 grams of carbs, and less than 1 gram of protein!!! This product is also fortified with vitamins in an attempt to up the nutirent content.


For those who are lactose intolerant and rely on milk alternatives in an attempt to get some nutrients, there is a better option! Nestle has a new milk product called FairLife. It comes in Chocolate Milk, 2% and Skim Milk, and the best part is that it is actually made from cow's milk! Now you may be thinking "why is she saying this if I can't have milk because of the lactose!" FairLife is Ultra High Pasturized Milk, meaning that it is heating to an extremely high temperature which breaks down, or denatures the lactose proteins, making it lactose free. Not only is it lactose free, but there's also 50% more protein than regular milk, half the carbohydrate content, and 30% more calcium! Let's look at the nutrient fact panel

Just like the regular skim milk, there is 80 calories, only 6g of carbohydrates, and 13g of protein!! This milk really packs a punch and is great after a tough workout.

NUTRITION FACTS

Serving Size 1 cup (240ml)
Servings Per Container About 7
Amount Per Serving
Calories 80 Calories from Fat
 % Daily Value*
Total Fat 0g0%
Saturated Fat 0g0%
Trans Fat 0g
Cholesterol 5mg2%
Sodium 120mg5%
Total Carbohydrate 6g2%
Dietary Fiber 0g0%
Sugars 6g
Protein 13g26%
Vitamin A 10% Vitamin C 0%
Calcium 40% Iron 0%
Vitamin D 25%
*Percent Daily Values are based on a 2,000 calorie diet.
Ingredients: Nonfat Ultra-Filtered Milk, Lactase Enzyme, Vitamin A Palmitate, Vitamin D3
Contains Milk. 

Now that you have all this information, it's time for you to decide what is best. You can't milk a soy bean, almond or coconut! 

Monday 16 January 2017

Ditch the Dips!

When I was walking down the canned goods aisle the other day with my parents, I saw that cannellini beans were on sale so I had to pick some up! I wanted to make my own hummus to bring back to my apartment at school and knew that I didnt have a food processor there, so it had to be made here. Hummus is very easy to make and a very nutritious snack. It's a lot healthier than breaking out sour cream based dips at parties, or for a midday snack with something crunchy. Not only is hummus a good dip, but it can also be mixed into salads and used as a dressing, put on top of grilled meat to add some flavor, and even replace mayo in your sandwiches. There are endless possibilities with hummus!

Besides being mighty tasty, hummus is also high in protein and healthy fats. Cannellini beans have 6g of protein per half cup serving! Perfect for anyone on a meatless diet trying make sure you're getting enough protein. Hummus is also made, most of the time, with extra virgin olive oil. Olive oil is high in one of the heart healthy fats called Monounsaturated fat. Monounsaturated and polyunsaturated fats can help to reduce LDL cholesterol levels in the body, which can reduce the risk for heart disease.  

Next time you're trying to decide what to bring to a family gathering, or just want to make something tasty to snack on- Turn to Hummus! Delicious, easy, and nutritious too! 

When you make your own hummus, you can decide what type of bean you want to make it with! I like my hummus made with cannellini beans, but some may like it with chickpeas or even kidney beans. Why not try this recipe a few times with different beans!  Here is the recipe I used to make it!

Ingredients

1/4 cup olive oil, divided
cloves garlic, peeled and minced 
cans (15 oz. each) white beans (I used cannellini beans), drained and rinsed
2 tablespoons fresh lemon juice
2 teaspoons kosher salt
sprigs fresh rosemary, rinsed

Preparation

  1.  In a 10-inch frying pan over medium heat, stir half the olive oil and the 2 cloves garlic until fragrant, being careful not to brown garlic, about 1 minute. Pour the oil and garlic into a food processor. Wipe out the pan and set aside.
  2. Add white beans, lemon juice, and salt to the food processor and whirl until smooth. Pour into a serving bowl.
  3. Return the frying pan to medium heat and add the remaining 2 tablespoons olive oil and the rosemary sprigs. Warm the rosemary in the olive oil until fragrant, about 3 minutes, stirring occasionally so the rosemary doesn't burn. Remove from heat and let cool 10 minutes.
  4. Set the rosemary aside and drizzle the olive oil over the bean dip. Mince one teaspoon of the rosemary leaves and sprinkle over the dip.
  5. Do-ahead tips: Make dip up to 2 days ahead. Store dip in an airtight container in the refrigerator. Bring dip to room temperature before serving. Prepare the rosemary oil right before serving.
Thank you diningwithadinergirl.blogspot.com for this great recipe!

Tuesday 10 January 2017

Tots with a Twist! (Picky Eater Approved)

We love tater tots in my house. We could eat a whole bag of them if we didn't care about the nutrient content of them. This recipe I found makes tater tots, with a twist! Instead of potatoes, I shredded up some zucchini. Zucchini is a very versatile vegetable. It can be fried into chips, chopped into a salad, or sauteed as a side dish. My dad actually introduced my mom to zucchini when they first got married. My mom was a very picky eater when she was younger, and it didn't help that my grandma would mostly serve meat, potatoes, and corn or peas for dinner. Mom was pleasantly surprised by this dish, and went back for seconds and thirds! You, just need 10 minutes to prep and 20 minutes to roast in the oven, and you have a tasty and easy side dish even picky eaters will love! Its really important to get as much water as possible rung out of the tots to help them crisp up.
These are the tots before they went into the oven!

The recipe was adapated from Skinny Taste

INGREDIENTS:

  • cooking spray
  • 1 packed cup grated zucchini
  • 1 large egg
  • 1/4 medium onion, minced
  • 1/4 cup grated reduced fat sharp cheddar cheese
  • 1/3 cup seasoned breadcrumbs
  • 1/4 tsp kosher salt and black pepper to taste

I added a little bit of chile powder to add a little kick to these too. Instead of the salt, you can substitute it for Garic Salt which will enhance the flavor as well

DIRECTIONS:


  1. Preheat oven to 400°F.  Spray a baking sheet with cooking spray.
  2. Grate the zucchini into a clean dish towel until you have 1 packed cup.  Wring all of the excess water out of the zucchini, there will be a lot of water. In a medium bowl, combine all of the ingredients and season with salt and pepper to taste.
  3. Spoon 1 tablespoon of mixture in your hands and roll into small ovals. Place on the cookie sheet and bake for 16 to 18 minutes, turning halfway though cooking until golden. Makes 16.

NUTRITION INFORMATION

Yield: 3 servings, Serving Size: 5 tots
  • Amount Per Serving:
  • Smart Points: 3
  • Points +: 3
  • Calories: 108
  • Total Fat: 4.3g
  • Saturated Fat: g
  • Cholesterol: mg
  • Sodium: 262mg
  • Carbohydrates: 11.5g
  • Fiber: 2g
  • Sugar: 2g
  • Protein: 7g


Read more at http://www.skinnytaste.com/zucchini-tots/#5tkJbVtmdtR5W5wx.99

Sunday 8 January 2017

How to Meal Prep for Week Night Dinners!

Are you a very busy person and have a hard time putting together nutritious dinners fast on week nights? Do you turn to convience foods and fast food to just to grab a quick dinner and get on with the day? We can change that! Making a nutritious dinner for you and your family, or roommate if you're a college student like me, doesn't have to take hours to prepare. Making home cooked meals saves you money, and can become a family activity every one can take part in. Kids are more likely to eat and try new things if they help make the food and know how it is prepared. This could be the end of a picky eater! Another thing that helps assure you're eating more nutritious foods and getting family time is eating dinner around a table together at the same time. Step away from the TV and the couch and enjoy a meal together. Enjoy each other's coompany and converstation and help each other make healthy choices together.

Here is your 1 week meal plan, complete with entrees, along with great sides that will accopany the main dishes. Most of the meals can be prepped ahead of time and sit in the fridge or the freezer until it's ready to be cooked and ate.

Recipes are in the links provided

Day1- Spicy Turkey Meat Loaf with Ketchup Topping
Meatloaf can be made ahead of time and popped in the oven when going to eat. Doesn’t have to be made the day before eating! 
Vegetable- Sauteed Zucchini and Yellow sSquash. Slice zucchini and squash (can be done ahead of time), season with desired seasonings and saute with olive oil until translucent over medium heat
Starch- Garlic mashed potatoes
Although they cannot be made ahead of time, simple and easy prep
Day 2- Black Bean Burger
Double recipe for 4 burgers
Can be made ahead of time and stored in the fridge or freezer till use
Fries can be made and cooked with burgers are cooking.

Day 3- Chicken Taco Salad
Chicken can be cooked ahead of time, along with the vegetables being cut and prepared. Dressing can be made ahead of time as well. Left over beans and corn from the burgers can also be thrown on the salad.
Pair with baked tortilla chips and salsa
Day 4- Sweet Orange Salmon with Steamed Green Beans and Brown Rice
Spices for the salmon can be combined and set aside ahead of time and then rubbed onto the fish before cooking
Green beans can be trimmed ahead and stored in a refrigerator, and while fish is cooking, rice can be made. If salmon isn’t your favorite, any fish can be substituted
Day 5- Crock Pot Pot Roast
Throw everything into the pot before work and come home to a meal waiting for you!
  
All of the entrees can be prepped ahead of time and stored in the fridge or freezer until use. Maybe make this a sunday afternoon activity for the whole family! 


Wednesday 4 January 2017

What's Cooking? Buffalo Wing Cauliflower


Displaying IMG_3064.JPG

While on my break at work today, Dad and I were texting about what we were going to prepare for dinner. He said he had picked up some kielbasa to pan fry  with onions. It's a new year so I wanted to try a new recipe. I told him I would make buffalo wing cauliflower as a side. Dad and I are very adventurous with trying new foods and recipes, but Mom and my brother are very picky. I picked up a medium head of cauliflower after the gym today and started preparing dinner with Dad picked up my brother from baseball practice, and mom was at work. This recipe was super easy and had great flavor! Mom tried it and went back for seconds! That's crazy from someone who doesn't like vegetables. Vegetables don't have to be bland and tasteless anymore! Try this recipe, (adapted from food network), and let me know what you think!

Ingredients

Cheese Sauce:
1/3 cup nonfat sour cream
2 tablespoons crumbled blue cheese
1 tablespoon skim milk
2 teaspoons mayonnaise
Kosher salt and freshly ground black pepper

Buffalo Cauliflower:
2 tablespoons unsalted butter
1/4 cup hot sauce, such as Frank's
1 tablespoon freshly squeezed lemon juice
2 tablespoons olive oil
Kosher salt
8 cups cauliflower florets (from about 1 medium head)

Directions

Preheat the oven to 400 degrees F.
For the cheese sauce: Whisk together the sour cream, blue cheese, milk, mayonnaise, 1/8 teaspoon salt and a few grinds of pepper in a small bowl. Cover and refrigerate until chilled, about 30 minutes
For the Buffalo cauliflower: Meanwhile, microwave the butter in a small microwave-safe bowl on high until melted. Whisk in the hot sauce and lemon juice and set aside.
Mix olive oil, 1/4 teaspoon salt and 1/2 cup water in a large bowl. Add the cauliflower and toss until well coated. Spread the cauliflower on a rimmed baking sheet and roast until beginning to brown and just tender, 20 to 25 minutes. Whisk the hot sauce mixture again, drizzle over the cauliflower and toss with tongs to coat. Roast the cauliflower until the sauce is bubbling and browned around the edges, 5 to 7 minutes more. Serve hot with the cheese sauce.

Read more at: http://www.foodnetwork.com/recipes/food-network-kitchens/buffalo-cauliflower-with-blue-cheese-sauce.html?oc=linkback